
That is, all the tricks you need to clean and take care of your wooden cutting board so that it will last forever. If you are among those who have always thought that wood did not require care and attention, let me reassure you: your cutting board needs love. You must treat it well because then it will be an indispensable object, along with the right knives, to chop smoked trout to serve with asparagus and trout eggs. The care of your cutting board does not have to be daily, it will be enough to take care of it once every two weeks. In addition to a microfiber cloth and tap water you will need:
- Mineral Edible Oil: a petrol-based oil that hydrates the wood once it is absorbed. It is also commonly used on wooden spoons. It is colorless, odorless and very light. You can buy it online but they also sell it in pharmacies.
- Cutting Stump Wax: The second thing you need helps you protect the first thing. This type of wax is made with beeswax and coconut oil (or other type of oil). It helps to make surfaces water-repellent so that water doesn’t get inside the wood. You can also buy this online or at a store that sells wood kitchen tools.
Guide: How To Care For A Wooden Cutting Board
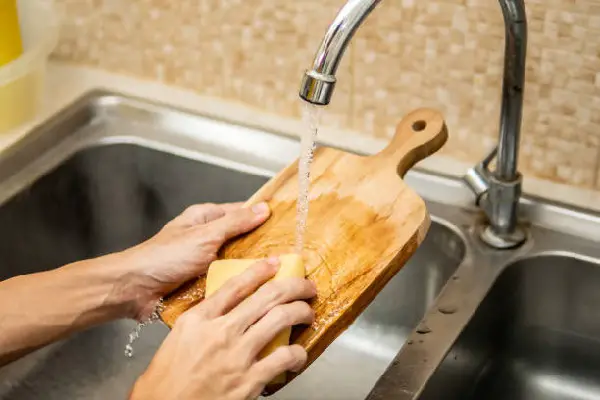
Step one: how to wash the cutting board
Wash the wooden cutting board with water (it’s ok if you use soap). Wash everything well including the underside and sides, remove all dirt with a microfiber cloth. Many people just wash the top, and end up damaging the cutting board. When moisture comes in contact with the grain of the wood, it creates bulges that, if uneven, can break or distort the cutting board.
A chopping board that rocks is usually a sign that only one side of the board was being washed. Even if you only use one side to put the flour you need to make mountain ravioli, wash both sides. Then wipe a cloth over it and let the cutting board dry overnight, balancing on the long side so that both sides can stand in the air.
Second step: the oil
The morning after washing the cutting board, use your hands to apply a generous layer of mineral oil to both the front and back. Don’t overlook the sides, corners, any handles, protrusions or indentations. Don’t overdo it with mineral oil – you don’t need to create puddles of oil on your cutting board, you need to use enough to cover the wood in an even layer. Just like when you’re in a hangover, the wood needs moisture.
Let the oil penetrate inside the cutting board for at least 3 hours, let it dry always resting on one of the long sides as after washing. While you wait for the wood to dry, make yourself a big plate of spaghetti with three tomatoes, you’ve earned it.
Third step: it’s time for the cream
After the oil has had enough time to penetrate into the wood grain, it’s time to proceed with the cream. Apply it directly to the wood and spread it well over the entire cutting board, taking care not to overlook the nooks and crannies. The cream is greasy and a bit sticky so if you don’t want it to go on your hands you can use a clean microfiber cloth. Once you’ve covered the entire cutting board, you’ll have created a barrier to help the wood retain the moisture it gained from the mineral oil.
By now you know what you need to do: balance it on its side, with the surfaces air-drying. Leave it like that for one night. Another night you will say, yes it is more than necessary. But while it dries you can start thinking of all the things you can prepare with your refurbished wooden cutting board
Fourth step: polishing
The morning after spreading the cream use the microfiber cloth to massage the cutting board with circular motions (just like the Karate Kid taught) to polish the top. The wood will become shiny and beautiful. When you are done, if you want to give it a try, pour a glass of wine on it and you will see that instead of staining the wood will slide off thanks to the barrier you have just created. And now that you are done, celebrate with a second glass of wine that you will not spill, I hope, and a nice lasagna with meat sauce.
When to replace the cutting board
Theoretically, if you’ve purchased a cutting board made from quality materials and take good care of it, it can last you a lifetime. With the process we’ve outlined, your cutting board can remain gleaming for decades. If you start to notice deep cuts on the surface, you can sand the surface. You have to do this evenly and it really does take a long time, but you will bring your cutting board back to life.
Then be sure to start cleaning it with the directions we gave you. Your cutting board can warp even with the best care. In this case, buy a new one. When the glue on the joints starts to come apart, very deep cuts will form and bacteria will develop that can damage your health as well as your food.